Tips to Fix “Update Apple ID Settings” Issue on iPhone and iPad
Before getting started with the tips, let’s first understand why the alert pops up!
What Causes the Red “Update Apple ID Settings” Alert to Appear?
Though the update notification mostly appears due to incomplete or expired information, in some rare cases, the alert shows up without any reason. Even after you have updated your Apple ID information, the red notification continues to be stuck there. And that’s what creates a lot of confusion. Thus, you will have to try out multiple solutions to get rid of the “Update Apple ID Settings” notification on iOS 14. Let’s hoping one of them clicks, and you can finally keep that alert away.
1. Enter Apple ID Password
In some cases, the update Apple ID settings notification tends to go away when you enter your current Apple ID password. As this trick has worked for me on a few occasions, I recommend you try this out first before moving to the tips below. Tap on the Update Apple ID notification. Then, click on Continue. After that, enter your Apple ID password and quit the settings menu. If the notification goes away, the chances are high that you have successfully fixed the red Apple ID update notification.
2. Ensure That Your Apple ID Information is Updated
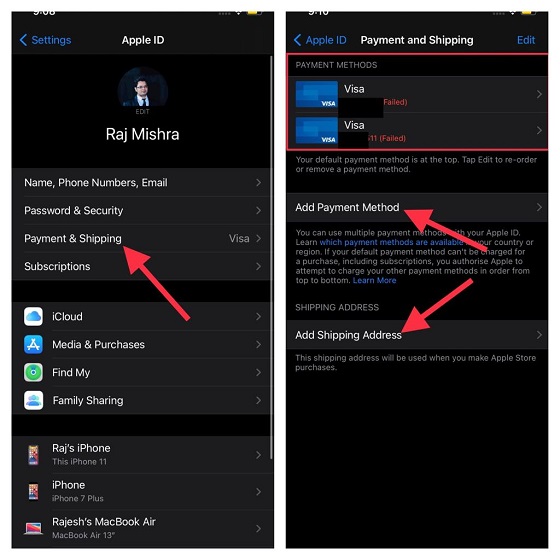
If your Apple ID information is incomplete or your credit card details have expired, the red update alert will show and remind you to take action. Therefore, make sure to update the information. Launch the Settings app on your iPhone or iPad, and then tap on your profile photo at the top. Next, tap on Payment and Shipping. Now, take a look at the payment methods. If you see “Failed” next to your credit/debit card, it’s time to update the payment method.
You can tap on the ‘Add Payment Method’ and then go through the instructions to add a new payment method. Besides, tap on the Add Shipping Address and ensure that the shipping address is updated. Also, double-check your Apple ID email address and phone number to ensure they are updated (Profile -> Name, Phone Numbers, Email).
3. Sign Out of Apple ID and Sign Back In
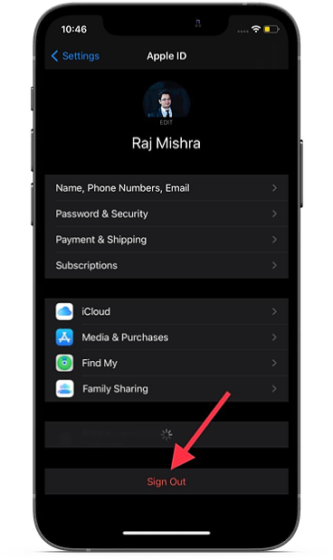
Another reliable solution I would recommend you give a try is to sign out of Apple ID and sign back in. A fresh sign-in may help in fixing the problem. When you sign out of iCloud, you get an option to keep a copy of the information that you store in iCloud on your device. Be sure to keep a copy of your essential information so that it can remain secure. Open the Settings app on your iPhone or iPad. After that, tap on your profile photo. Then, scroll down and tap on Sign Out. If you have turned on Find My iPhone/iPad, you will need to enter your Apple ID password to proceed.
Next, sign in using your Apple ID and password. Now, check out if you have finally got rid of the notification.
4. Update Software on Your iPhone and iPad
If none of the tips above worked in fixing the “Update Apple ID Settings” issue, try updating the software? The issue could very well be due to a miscellaneous bug. Given how rampant bugs have become in recent iOS builds, it wouldn’t be wise to rule out the possibility.
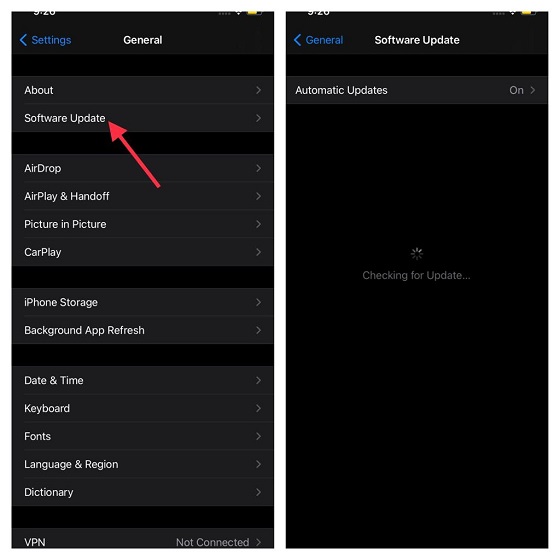
Head over to the Settings app on your iPhone or iPad -> General -> Software Update. Now, download and install the latest version of iOS/iPadOS on your device.
Troubleshoot Update Apple ID Settings Problem on iPhone and iPad
That’s it! I guess you have put that annoying Apple ID update notification to rest. But before you take a sigh of relief, make sure to let me know the trick that worked for you. Your valuable feedback may help other users who are stuck with the “Update Apple ID Settings” notification. Besides, let me know any other tips or workarounds that helped you fix this annoying problem.


