Play Apex Legends Mobile on Your PC (2022)
We have explained how you can install Apex Mobile on your Windows PC using Tencent’s Gameloop emulator and Bluestacks 5. Further, we compare the performance of the mobile game on both platforms.
Install Apex Legends Mobile using Gameloop on PC
This is the easiest method to install and start playing Apex Mobile on your PC. Both the BR game and this emulator, Gameloop, have been made by China’s Tencent. The latter has adapted the game for its emulator to deliver the best and most optimized performance to users.
So if you are interested in playing Apex Legends on your PC instead of mobile, follow the steps below:
- Visit this link and click the “Download” button to get the Gameloop emulator. Click the “Save” button on the pop-up window to download the emulator on your PC.
- Next, open the downloaded EXE file and click the “Install” button.
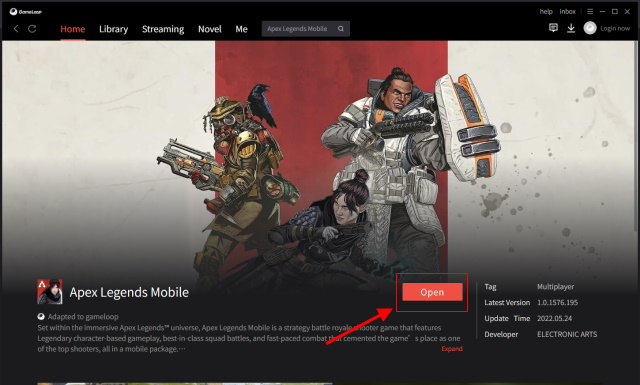
- Once the Gameloop emulator is installed, you need to click “Start” to power it up. You don’t need to log into the emulator and can simply head to the Apex Legends Mobile listing from the home screen. Click the “Install” button to start downloading the mobile game.
- Depending on your internet connection, it will take somewhere from 5 – 20 minutes to install Apex Legends Mobile on your PC. Once the game is installed, you can click the “Open” button on its listing to start playing.
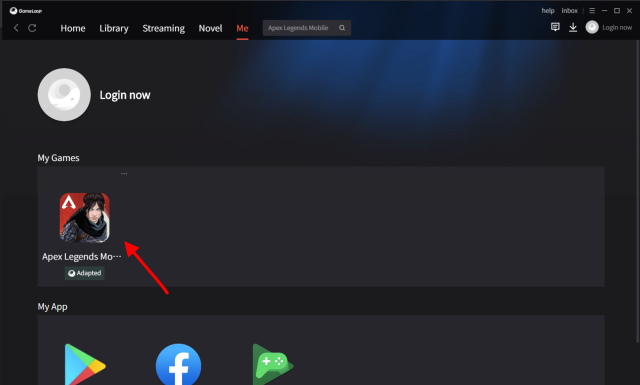
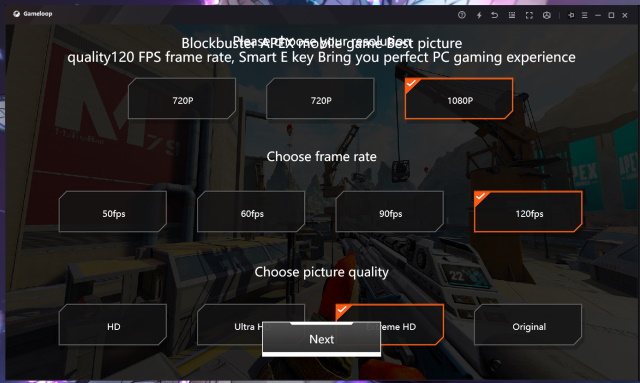
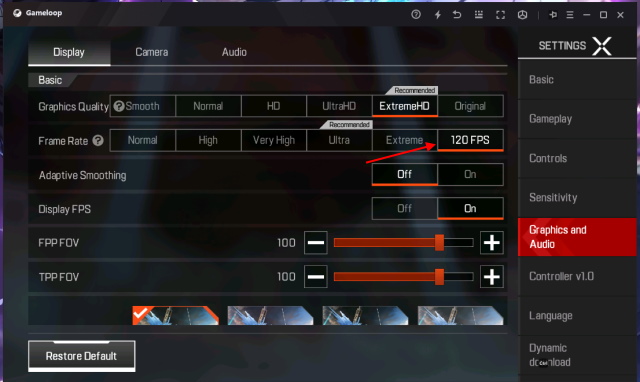
Alternatively, you can head to the “Me” tab from the top navigation bar and click on Apex Mobile’s icon under “My Games” to start playing. - When the game starts up for the first time, Gameloop will ask you to choose the resolution, frame rate, and picture quality. I was able to smoothly run Apex Mobile using the 1080p @120FPS and ExtremeHD graphics settings on my PC, powered by Ryzen 5 3600 and Nvidia GeForce RTX 3060. Yeah, one of the highlights of Gameloop is that you get the 120 FPS frame rate option in Apex Legends Mobile. The performance will, however, vary based on your hardware. I was getting an average of 95 FPS during my gameplay.
- And voila! You can then log in with your preferred method, including your EA or Google account, Facebook, and Twitter. And once you complete the rookie tutorial, you can jump into the action and be the top-rated legend in the Outlands.
- Finally, with everything set up and running, take a look at some cool Apex Legends Mobile gameplay from the Gameloop launcher on my PC right here:
- If you want to change the cursor lock/ unlock key in Gameloop from Ctrl to anything other key, follow the steps showcased in the video below:
- Also, it is also important to mention that Gameloop, for some reason, has blocked HUD customization. That means you cannot switch the controls interface or change the layout to move around the controls and have them be a certain size.
Install Apex Legends Mobile using BlueStacks 5 on PC
We wanted to present you with two options to install and play Apex Legends Mobile on your PCs but kept running into one problem or the other with BlueStacks 5. First, we encountered the “unable to run on this device” error, which was resolved by switching the device variant from the settings.
Then, the game did power up, but we were greeted with an OpenGL 3.1 not supported error in BlueStacks 5. We managed to fix that error as well by tweaking some graphics settings – changing the Graphics engine mode to “Compatibility” and making sure the “Graphics renderer” was set to “OpenGL”. And now, Apex Legends Mobile downloaded in-game updates and moved past the intro screen only to greet us with another error. We got the “emulator detected” error repeatedly, even after clearing the app storage and installing the game multiple times. It was probably because I was using a 64-bit emulator instance.
Yeah, for some reason, BlueStacks 5 recommends using a 32-bit Android Nougat instance to play Apex Mobile using its emulator. That was another warning I got on my Windows 11 computer running a 64-bit Nougat emulator.
So, as suggested by BlueStacks, I disabled Hyper-V and other related virtualization tools on my Windows 11 PC to create a 32-bit Nougat instance. And well, it was then that we were finally able to play Apex Legends Mobile using BlueStacks. You can follow our guide on how to enable Hyper-V in Windows 11 and disable everything we had enabled in step #5, as well as the Windows Sandbox and WSL (Windows Subsystem for Linux).
Now, if you are ready to be faced with one (or more) of these errors and prefer BlueStacks over Tencent’s Gameloop emulator, follow the steps below:
- Visit this link and click on the “Play Apex Legends Mobile on PC” button to download the BlueStacks 5 emulator.
- Next, open the downloaded EXE file and click the “Install now” button in the BlueStacks 5 installer.
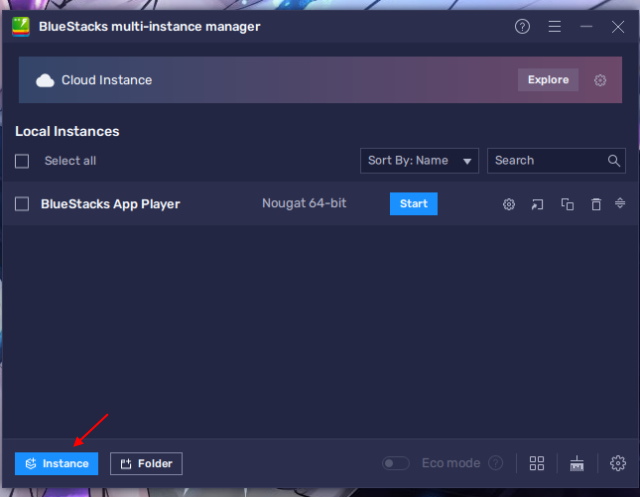
- Now, instead of opening the emulator, you need to open the “BlueStacks 5 Multi-Instance Manager” from the newly added shortcut on your desktop.
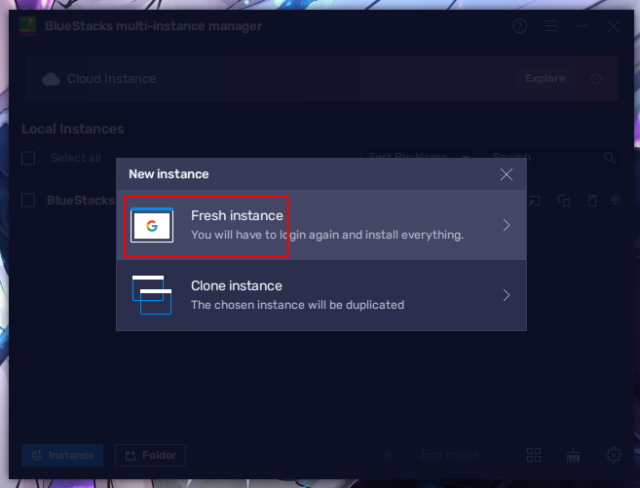
- Here, click the “Instance” button at the bottom left corner of the screen. Then, select “Fresh instance” in the pop-up that appears.
- Now, BlueStacks will ask you to choose the Android version. Here, you need to select “Nougat 32-bit” from the dropdown menu and click “Next”. You will not be able to create a 32-bit Nougat instance if you have not disabled Hyper-V on your Windows 10/ 11 PC.
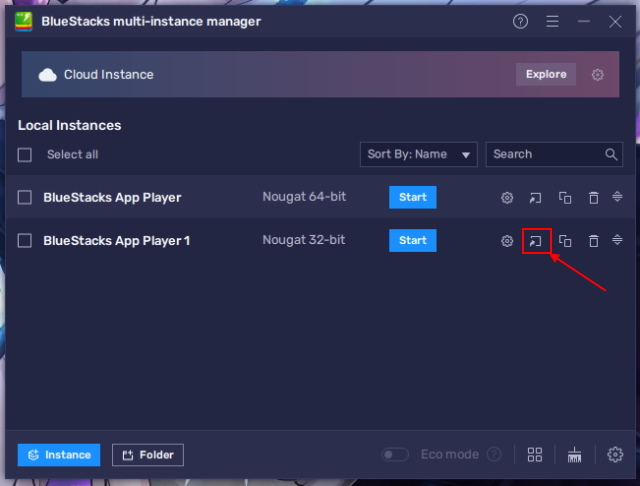
- Next, copy the settings shown below if your PC can handle it, and click on “Download” to create a 32-bit Nougat instance in BlueStacks 5. Also, create a desktop shortcut for the newly created instance as we will need to open it with admin privileges to avoid any errors. 32-bit Nougat instance settings create desktop shortcut for new instance
- Now, right-click on the BlueStacks App Player and select the “Run as administrator” option. If you wish to run all apps and programs as an administrator in Windows 11, follow the linked guide.
- From the BlueStacks 5 homescreen, click on either the Play Store icon or the Apex Legends Mobile icon under the “Popular Games to Play” section.
- The emulator now requires you to log into your Google account to download Apex Legends Mobile on your PC.
- Once you have logged in, search for Apex Legends Mobile in the Play Store and hit the “Install” button. It will take around 10 – 15 minutes to download the game, depending on your internet speeds.
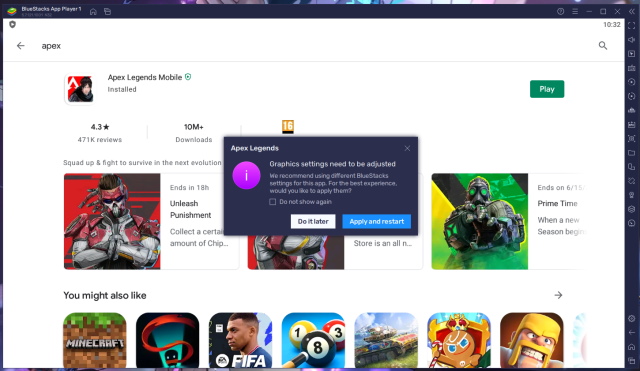
- After the game is installed, open and log in with your preferred method. You can now jump into the action and start taking down others to become the Champion in Apex Legends Mobile. Bluestacks may require a restart after installation to adjust the graphics driver settings.
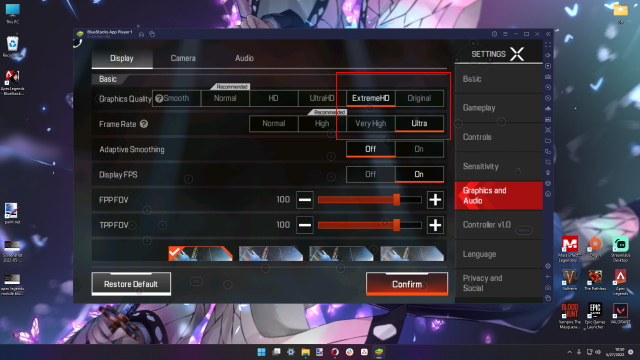
However, note that since we have installed the game via the Play Store, it does not have the 120FPS frame rate option like Gameloop. The frame rate setting in Apex Legends Mobile on Bluestacks is capped at Ultra, and it didn’t deliver a smoother performance in my case. Thus, I’ve shared gameplay footage with the “High” frame rate setting enabled. - Finally, check out the Apex Mobile gameplay on the BlueStacks 5 emulator in the YouTube video below. Fair warning, the performance is not as good as one might expect.
Apex Legends Mobile Performance: Gameloop vs BlueStacks
With the installation process for Gameloop and BlueStacks out of the way, it’s time for us to talk about the game’s performance on both. If you have watched the gameplay videos attached above, you already know that the performance of Apex Legends Mobile on Gameloop on a PC is far superior compared to BlueStacks. And well, the obvious reason for that is optimization.
The Gameloop emulator comes from Tencent, which has developed Apex Mobile in collaboration with EA’s Respawn, so the game has been adapted to the platform. As shown in the screenshots above, the game carries an”Adapted” moniker, which shows that Tencent has made further optimizations before bringing this hero-based battle royale game to its emulator.
The biggest highlight of Apex Legends Mobile on Gameloop is that it includes a dedicated 120 FPS frame rate option. It even supports up to 2K resolution if you have compatible hardware. On the other hand, as stated above, BlueStacks caps at Ultra (60FPS) frame rate, the same as most mobile devices. It does not even support the 90 FPS option in Apex Legends Mobile found on select iPhones, which is a major disappointment.
As for the gameplay, we don’t need to say much as you can closely see how Gameloop and BlueStacks performed in the videos above. Even though the latter was using my RTX 3060 GPU, the performance was appallingly terrible. The former, on the other hand, delivered a much more enjoyable and PC-like experience.
After testing both emulators on my PC over the past week, the only shortcoming of Gameloop that I discovered was the HUD customization ban. However, the default keymapping is perfect, and you won’t run into any issues while playing the game. At least I didn’t. It did not hinder my gameplay in any way. BlueStacks does not have any such ban and allows you to change the controls UI and adjust the placement of the controls as well.
Moreover, the keymapping in Gameloop is more versatile and feels easier to use when you have to interact with items. BlueStacks felt a bit clunky to me, and I had to remap some keys a couple of times in the middle of a match, as shown in the gameplay footage above. Moreover, the number of errors I had to resolve to be able to install Apex Legends Mobile on my PC via BlueStacks was nothing short of a nightmare.
Use Emulator to Play Apex Mobile on Your PC
So yeah, if you are looking to install Apex Legends Mobile on your PC, I would recommend going for the Gameloop emulator. Bluestacks has been an obvious choice for mobile gamers in the past, but it needs to work on optimizing this popular new game to run smoothly on its emulator. Also, you run into a lot more errors and issues while installing Apex Legends Mobile on BlueStacks. That said, if this installation guide proved helpful to you, don’t forget to share it with your gamer friends. Also, while you are here, read about all the characters in Apex Legends Mobile and check our gun guide for Apex Legends Mobile to pick your perfect legends and loadouts. So, how has your experience been with Apex Legends Mobile? Tell us in the comments section. Don’t hesitate to ask questions or share your queries as well.
