Use Widgetsmith on iPhone: A Complete Guide
Before you get started, keep in mind that Widgetsmith is available for free (download) but you will need to upgrade to the premium version ($1.99/month and $19.99/year) if you wish to unlock all the goodies including the elegant themes and styles. Notably, the widget app is also compatible with iPad. This means most of the tips mentioned here will apply to the iPadOS device as well. Now that you have got hold of the app, it’s time to jump right in!
Create Home Screen Widget with Widgetsmith on iPhone
Crafting a nice-looking iPhone home screen widget with Widgetsmith is as straightforward as it can ever get. You need to follow a few steps and it’s done. Here’s what to do:
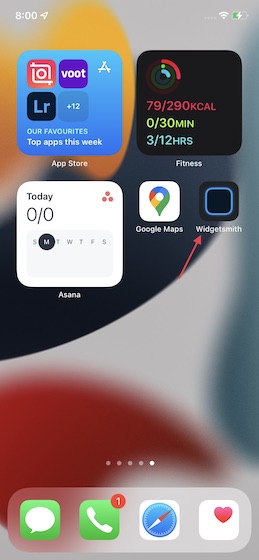
Launch Widgetsmith on your iPhone.
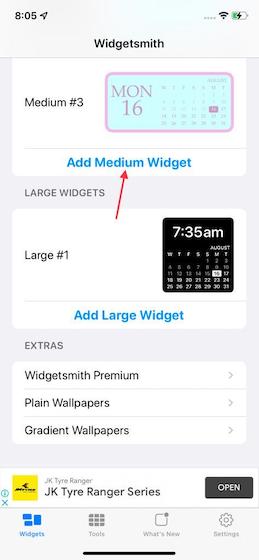
You will get three different widget sizes to choose from: small, medium, and large. Tap on Add Small/Medium/Large Widget to choose the preferred one.
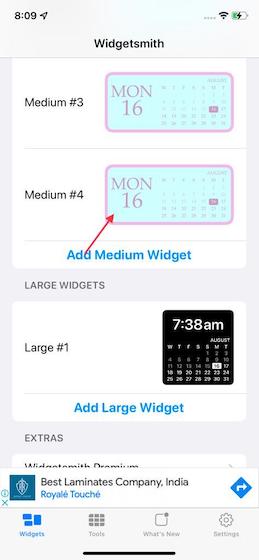
Next, tap on the widget to get started with customization.
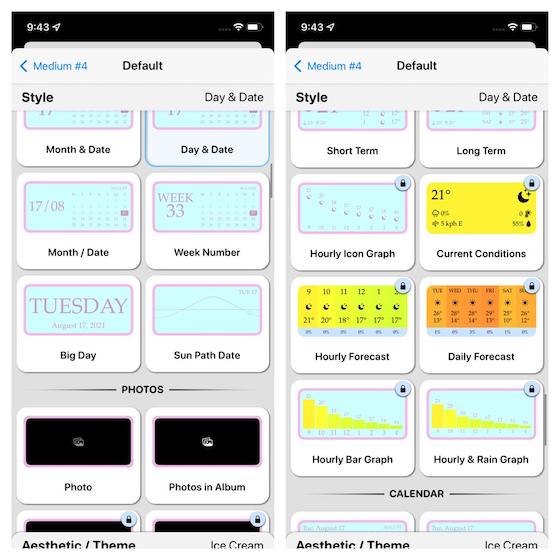
You will see a list of information you want your widget to display along with tons of color and style options. You can choose from the ones you like. Here’s list of widget information you can choose:TimeDateCalendarRemindersWeatherStep countingHealth & ActivityTidesAstronomyCustom (Photo, Photos in Album, Photo Temperature, Photo Temp & Conditions, Photo Date, Photo Day, Photo Day & Date, Photo Fuzzy Time, Photo Countdown, Photo Date & Time, Custom Text, and Blank).
Now, select the desired style and then customize it.
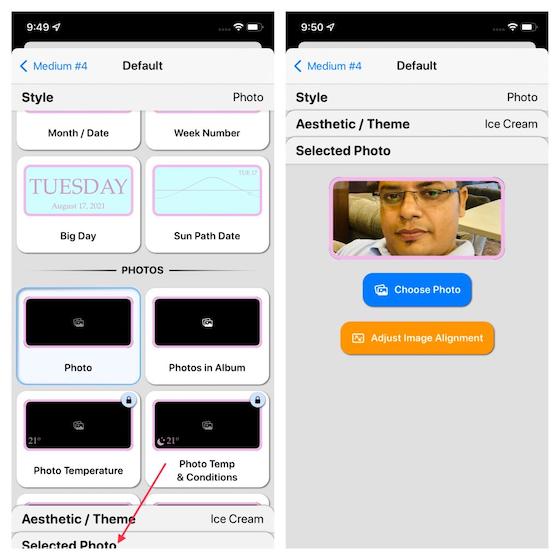
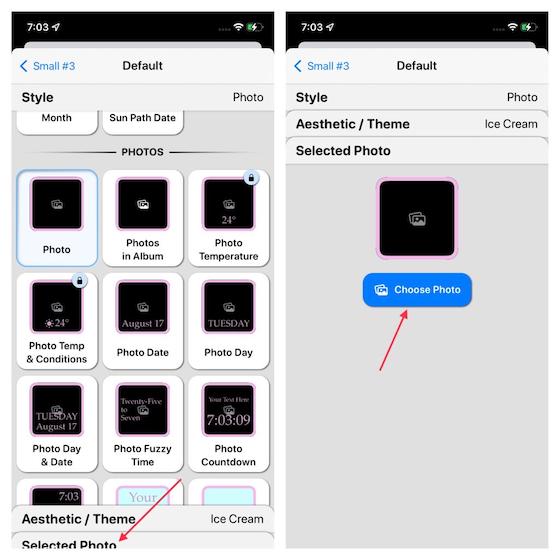
Note: Depending upon the type of widget you choose, the option bars located at the bottom will change. For instance, if you select the “Photo” widget, you will get the option to choose an image from your photo library. And if you choose Custom Text, you will have the option to add text.
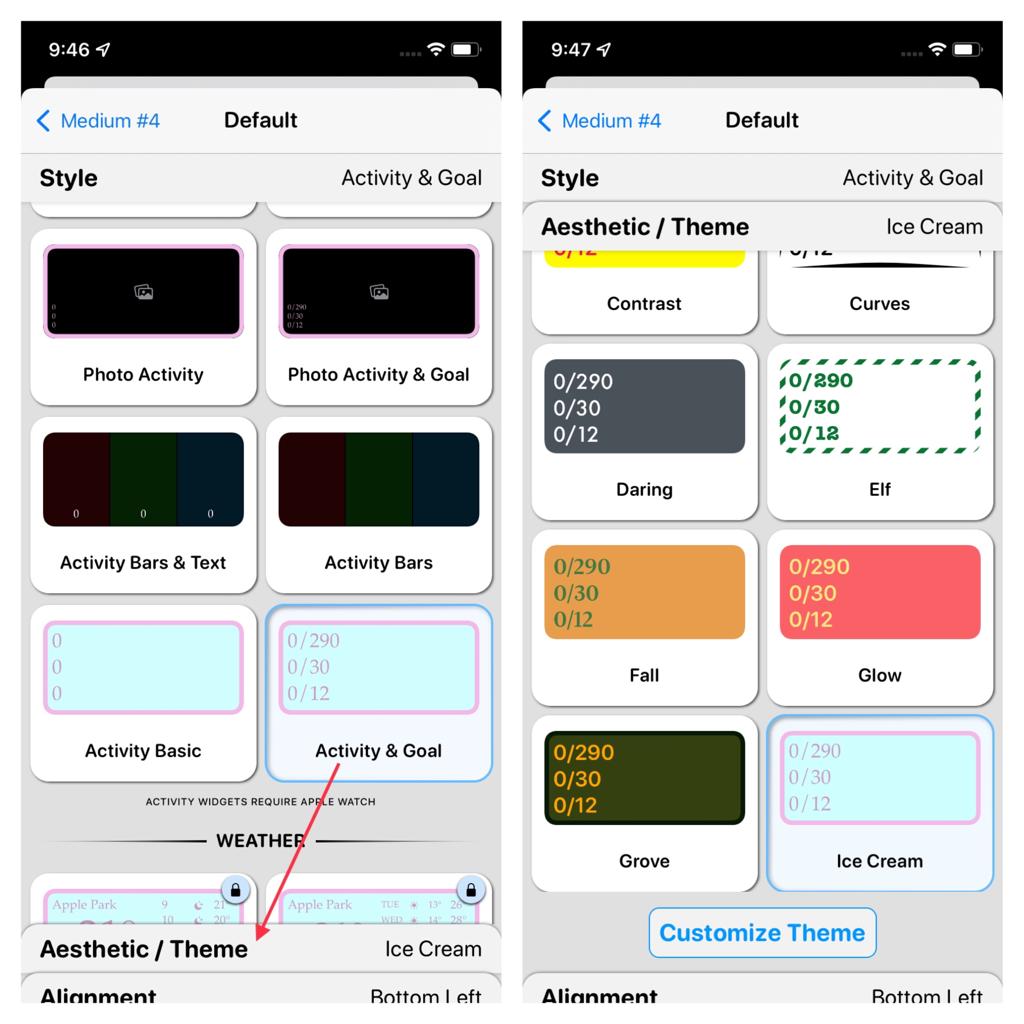
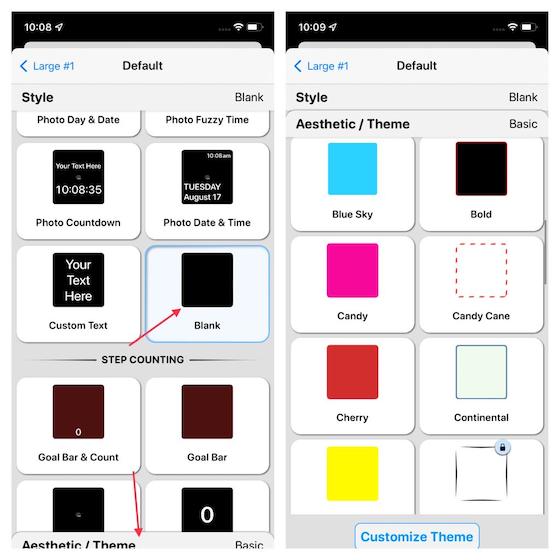
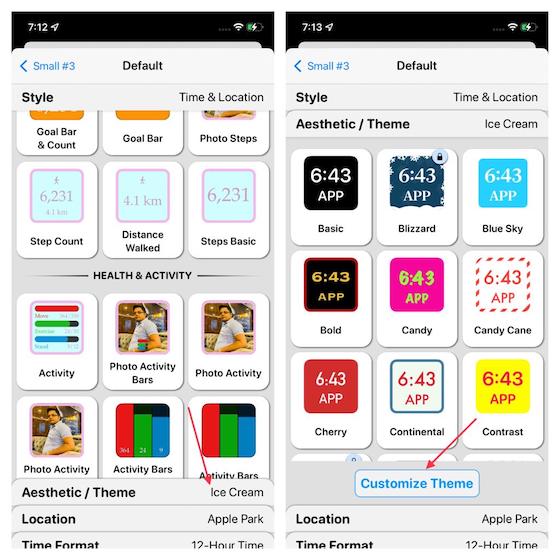
You will also get the option to change the aesthetics/theme of widgets at the bottom. Simply tap on the aesthetic/theme option and then choose from a plethora of available themes. For a more personalized look, you can even customize a selected theme.
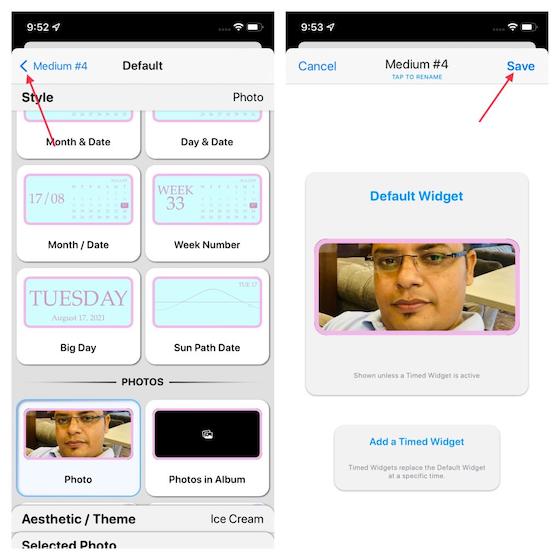
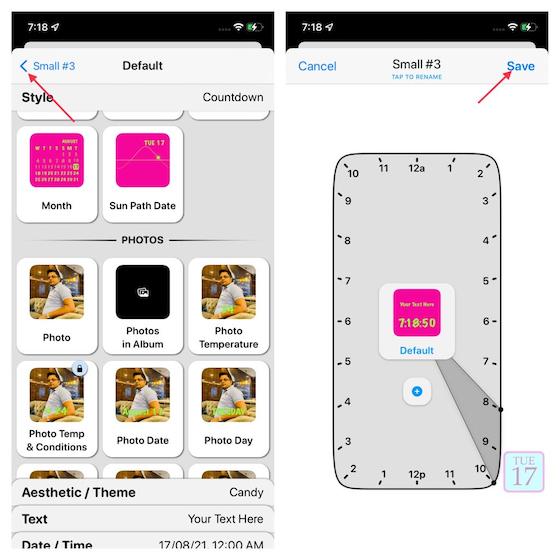
Once you are done with the customization, press the back button in the upper left corner of the screen and then tap on Save in the upper right corner of the screen. And it’s done.
Add Custom Widget to Home Screen on iPhone
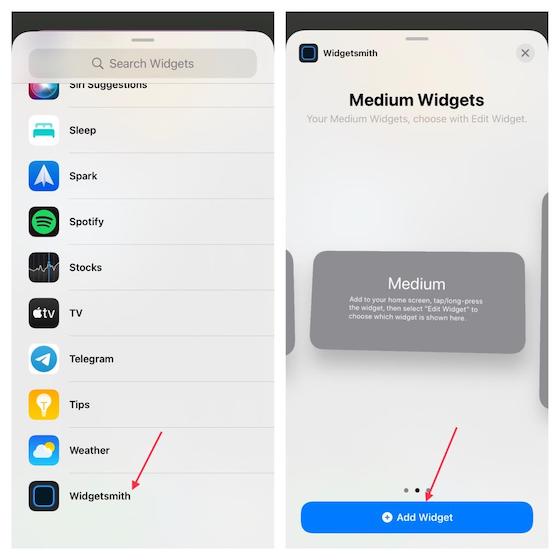
After you have saved the widget, head over to the home screen and then press an empty area to enter the jiggle mode. After that, tap on the “+“ button at the top left to bring up the widgets library. Now, locate Widgetsmith and tap on it. After that, select a size and then add the widget to your home screen.
In addition to this, you can add blank widgets too. They come in super handy when you want to customize your iPhone home screen to your heart’s liking. I prefer to place invisible widgets at the spot that I want to remain empty. It enables me to place app icons at the desired spot on the home screen.
Making a blank home screen widget using Widgetsmith is quite easy. Simply select a Blank style located in the Photos section and then tap on the Aesthetic/Theme. After that, select a matching theme.
Create a Timed iPhone Widget Using Widgetsmith on iPhone
One of the highlights of Widgetsmith is the “Timed Widget” that lets you automatically replace default widgets at a specific time of day. You can take advantage of this feature to show weather information in the morning, the calendar for the next day in the afternoon, and step count in the evening.
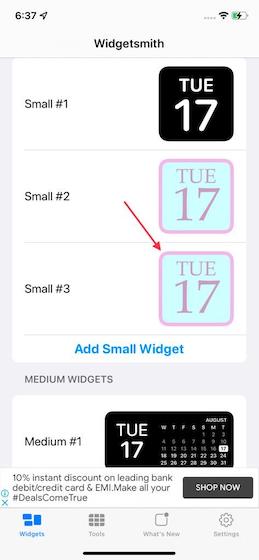
Select the widget size and widget in the Widgetsmith app.
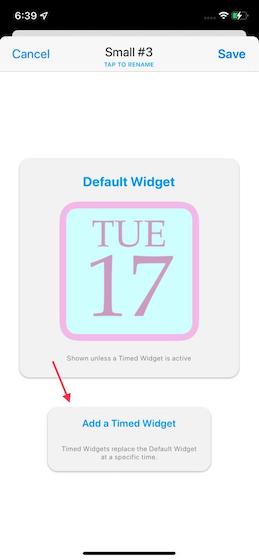
Now, tap on the Add a Timed Widget option.
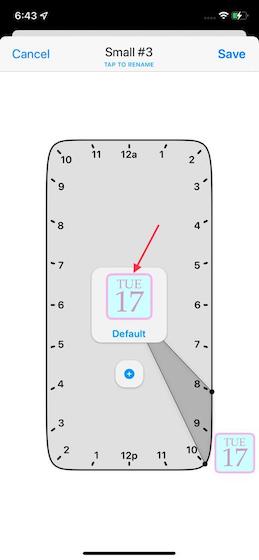
Next, tap on the Default option (located in the middle of the widget).
Next up, go ahead and customize the widget to your heart’s liking.
Again, you can choose the style to show specific information you want. For instance, if you are a fitness-loving person, the Health & Activity related styles would be super handy. If you want to keep a track of weather information, go for the weather style.
“Photos in Album” could also be a great pick if you wish to show some of your favorite shots on the home screen. It’s worth mentioning that if you choose Photos, you will need to tap on the Selected Photo/Album option at the bottom and then select an image/album from the photo library.
By default, Ice Cream is set as the preferred theme. However, you can choose a different theme by tapping on the Aesthetic/Theme option at the bottom and then selecting a suitable theme. You can also select the Customize Theme to add some customizations.
Once you have customized the widget, tap on the back button located in the top left corner of the screen and hit Save in the top right corner of the screen.
That’s it! You can refer to the above section to add the new widgets to your home screen and you are good to go.
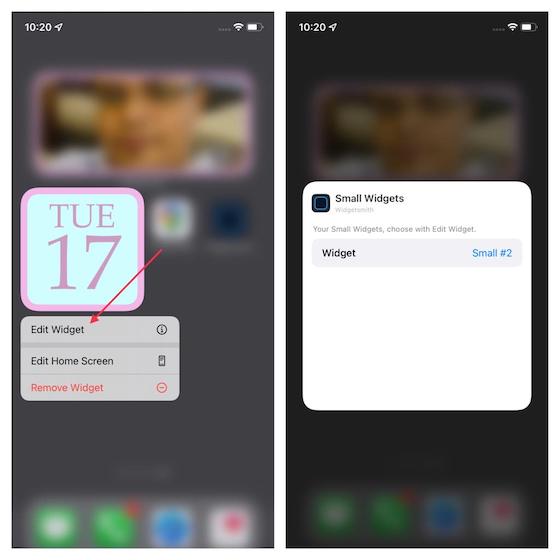
Furthemore, you can edit your custom widget at any time you want. Just open the Widgetsmith app, select your widget, and then use all the available tools to customize it once again. Besides, you can also edit the widget right from the home screen. Long-press the widget and then choose Edit Widget. After that, do the needful.
Tips to Get the Most Out of Widgetsmith on iPhone
Widgetsmith also has a number of additional tricks up its sleeve than what meets the eyes. So, if you want to go for full-on customization, make sure to check out some handy tips given below.
Use Plain/Gradient Wallpapers to Deck Up Your iPhone Home Screen
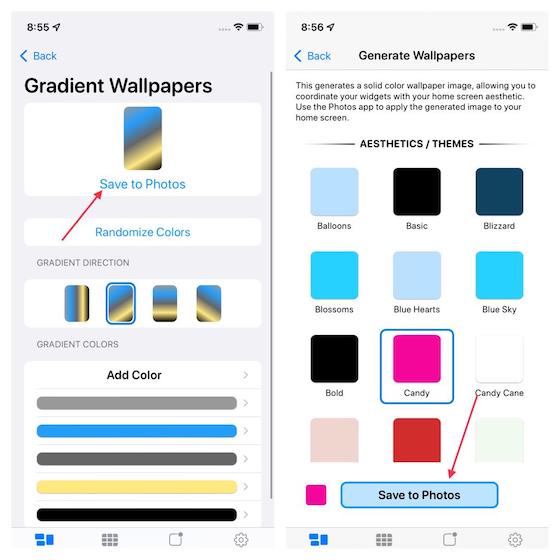
Wallpapers play a significant role in letting you design your home screen elegantly. Guess what? Widgetsmith provides a pretty impressive library of both plain and gradient wallpapers, which you can use to amp up your customization game.
Launch Widgetsmith app on your iPhone -> scroll down to the Extras section and then choose Plain Wallpapers/Gradient Wallpapers. Now, select a nice-looking wallpaper and save it to your camera roll. As there is no restriction, you can choose as many wallpapers as you need.
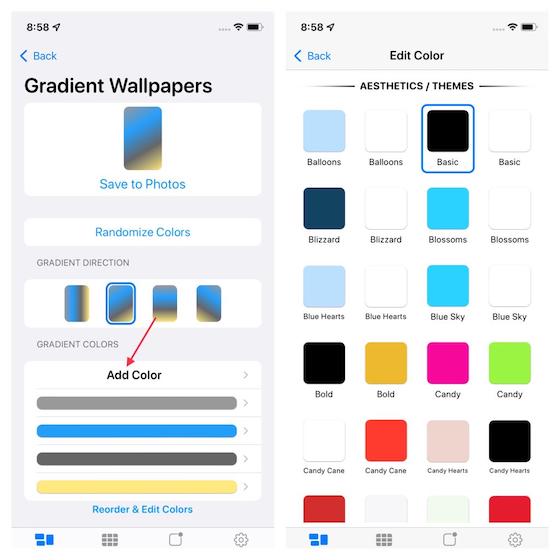
What’s more? Widgetsmith also allows you to edit a gradient wallpaper using a ton of stunning themes like Blue Sky, Candy, Candy Hearts, Blizzard, Cherry, and whatnot. So, bring all of your creative ideas to the fore to design some attractive gradient wallpapers using Widgetsmith.
Customize Time Format
Widgetsmith offers a handful of time formats. Hence, you can choose the desired time format as per the theme of your widget. To do so, head into the Settings section of the app (check out the cog icon at the bottom right) -> Default Settings -> Time Format. Now, you should see different time formats such as system settings, 24-hour time, AM/PM Time, Short AM/PM, and 12-Hour Time. Select the preferred option and you are good to go.
Select a Default Aesthetic/Theme
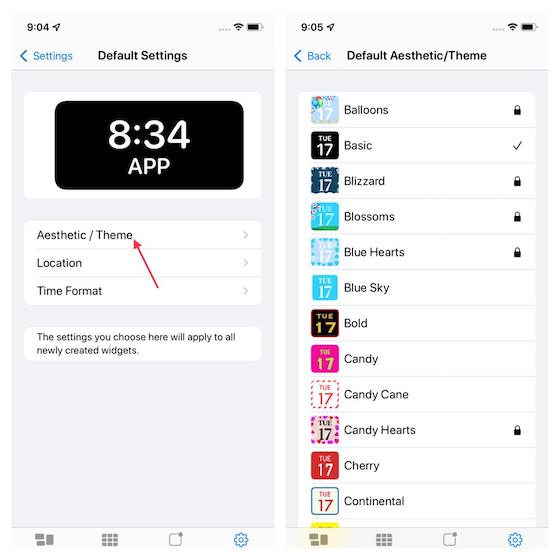
Notably, Widgetsmith comes with plenty of cool themes including Ice Cream, Light Hearts, Glow, and a lot more. So, it doesn’t matter what sort of custom widgets you are trying to make for your iPhone, you will always have a variety of themes and aesthetics to experiment with.
Navigate to the Settings section of the app -> Default Settings-> Aesthetic/Theme. On this screen, you should see a massive collection of themes to pick from. Bear in mind that not all themes are available for free. Some premium ones like Blue Hearts, Blizzards, Blossoms, etc. are locked. So, you will need to upgrade the app to unlock them.
Customize Weather Settings
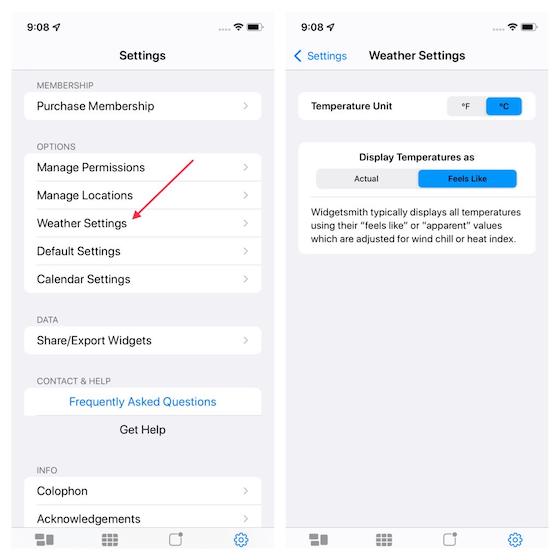
Another cool way to personalize your iOS home screen widget is by tweaking the weather settings. Widgetsmith shows temperatures using the “Actual” or “Feels like” values that are fine-tuned for heat index or wind chill. Based on your preference, you can choose to display temperature as “Feels Like” and “Actual.” You can even tweak the temperature unit for a custom widget. Head over to the Settings section and select Weather Settings. Now, customize the weather settings in accordance with your theme.
Customize Calendar Settings
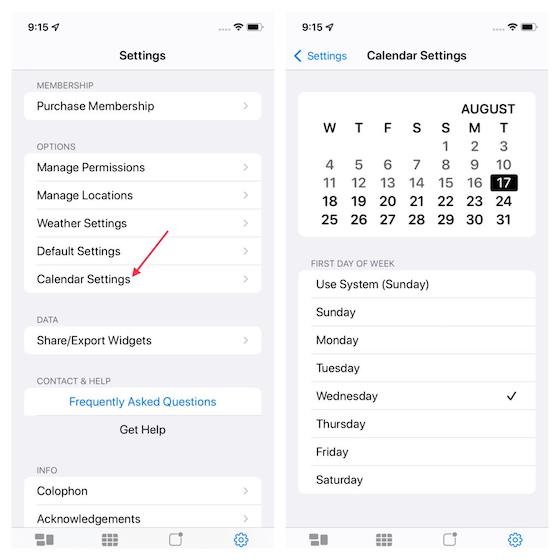
Widgetsmith also lets you customize calendar settings. Thus, you can choose to go with the system settings or fine-tune the calendar settings so that they are in sync with your home screen widgets. Go to Widgetsmith’s Settings -> Calendar Settings. Now, customize the calendar settings by either using the system settings or selecting a preferred first day of the week.
Share Your Custom Widgets with Your Loved Ones
Whenever I come across something fascinating, I love to share it with friends and loved ones. So, I’m really glad that Widgetsmith offers a pretty neat way to share custom iPhone home screen widgets. If you also believe in the age-old “Sharing is Caring” saying, chances are that you would appreciate this feature.
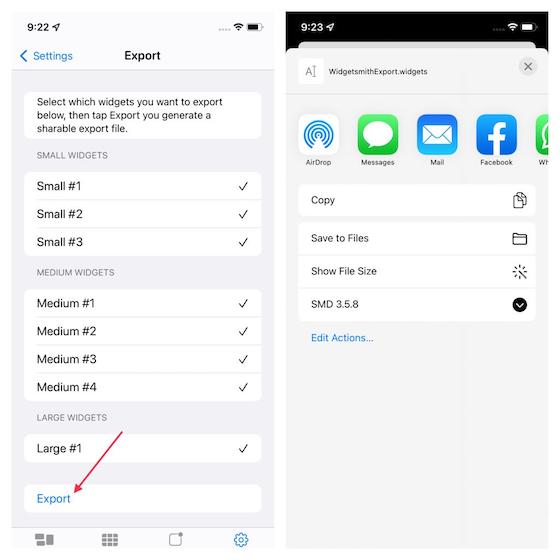
To get started, open Widgetsmith app -> Settings -> Share Export Widgets. Now, select the widgets that you want to share and then hit the Export option to generate a shareable export file. After that, select the preferred medium like email, iMessage, WhatsApp, and more to share your widgets.
Use Widgetsmith on iPhone With Ease
There you go! This is how you can use Widgetsmith to create fascinating iOS home screen widgets. As I said above, the app is loaded with a plethora of tools and themes to let you fully customize your widgets. So, every time you will dig a little deep, you will most likely come up with stunning concepts.
That said, do you have any feedback related to this iPhone home screen widget app to share with us? If yes, make sure to share in the comments section below.
